Title here
Summary here
January 9, 2022 in Aerospace, Programming by ![]() Dhulkarnayn—14 minutes
Dhulkarnayn—14 minutes
Embarking on the journey of programming a drone might seem daunting at first, but fear not – it’s more accessible than you might think. The expanding applications of drones across diverse industries underscore their growing significance. Dive into the realm of drone programming with a plethora of resources and guides available online, supporting multiple programming languages such as C, C++, Python, and more.
Drone programming extends beyond the realm of mere autonomous takeoff and landings. There are instances where drones are tasked with specific missions tailored to meet your requirements or those of your customers.
Video Credits: Dhulkarnayn, Elucidate Drones
Imagine wanting to program your drone to gracefully trace a triangular or square trajectory through the skies. The first step? Delve into the mathematical intricacies behind this aerial choreography before translating it into code.
As drones soar through the skies, relying heavily on the Global Position System (GPS) for outdoor navigation, it’s crucial to acknowledge the substantial mathematical groundwork underpinning their guidance and navigation. Brace yourself for an adventure where algorithms and coordinates dance in harmony with the crisp, open air.
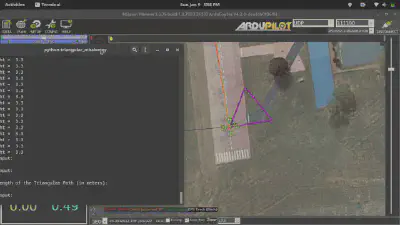
Are you ready to infuse your drone with the artistry of flight, guiding it through the skies in a mesmerizing triangular path? Let’s embark on this thrilling adventure by unlocking the secrets of equilateral triangles and transforming geometric elegance into code!

Image Credits: Dhulkarnayn, Elucidate Drones
To choreograph your drone’s dance in the sky, first, let’s unravel the enchanting properties of an equilateral triangle1:
60° each, infuse the triangle with a sense of balance and precision.Behold the dance of angles! The exterior angle of a triangle, gracefully formed between a side and its extended companion, holds the key to our drone’s celestial journey.

Image Credits: Dhulkarnayn, Elucidate Drones
As we uncover the mystical relationship between interior and exterior angles2:
Interior angle + Exterior angle = 180°
From this celestial equation, the exterior angle is revealed through a mesmerizing calculation:
Exterior angle = 180° - Interior angle
In the realm of equilateral triangles, where interior angles gracefully measure 60°, the exterior angle emerges as a majestic 120°.
Exterior angle = 120°
Note
As we embark on the journey of triangular path calculation, the dance between exterior angles and side length unfolds, guiding our drone through the skies.
Are you intrigued? Let’s dive deeper into the code, where mathematical elegance transforms into the ethereal flight of your drone!
Ready to witness your drone gracefully carving through the skies in a captivating triangular path? Let’s dive into the enchanting process of programming it to embark on this mesmerizing journey.
Before we delve into the intricacies of code, the first magical step involves generating a triangular trajectory and transforming its local coordinates into the captivating tapestry of geographical coordinates—latitudes and longitudes. Imagine the vertices of an equilateral triangle dancing in harmony with a chosen reference point or origin.
There are myriad ways to conjure this triangular path, but here’s a simple incantation: calculate the next geographic location by embracing the exterior angle (120°) as the bearing angle and infusing it with the magic of distance equivalent to the side length.
Repeat this spell three times, and behold—the geographic locations of your triangular trajectory are unveiled.
Now that you hold the mystical coordinates in your hands, guiding your drone through its celestial dance becomes a seamless endeavor. Simply orchestrate its journey to these sequentially revealed locations, and watch the skies become a canvas for your drone’s triangular masterpiece.
Are you ready to breathe life into this geometric ballet? Let’s infuse your code with the magic of flight!
Ready to breathe life into your drone with a captivating triangular mission? Let the magic unfold by bringing the following spell to your device. Simply execute the mystical git command in your terminal to download (clone) the script:
git clone https://github.com/Dhulkarnayn/triangular-mission-dronekit-pythonNote
For those not acquainted with the magical powers of git, fear not! Conjure it into existence on your device by reciting the following commands in your terminal:
sudo apt-get update
sudo apt-get install git
Alternatively, if you prefer the ancient art of copy and paste, inscribe the following script onto a file named triangular_mission.py on your device. Get ready to embark on a Python-powered drone journey like never before!
  1#!/usr/bin/env python
  2
  3#..................................................................................
  4# Author  :  Saiffullah Sabir Mohamed
  5# Github  :  https://github.com/TechnicalVillager
  6# Website :  http://technicalvillager.github.io/
  7# Source  :  https://github.com/TechnicalVillager/triangular-mission-dronekit-python/
  8#..................................................................................
  9
 10# Import Necessary Packages
 11from dronekit import connect, VehicleMode, LocationGlobalRelative
 12import time, math
 13
 14def basic_takeoff(altitude):
 15
 16    """
 17
 18    This function take-off the vehicle from the ground to the desired
 19    altitude by using dronekit's simple_takeoff() function.
 20
 21    Inputs:
 22        1.  altitude            -   TakeOff Altitude
 23
 24    """
 25
 26    vehicle.mode = VehicleMode("GUIDED")
 27    vehicle.armed = True
 28    time.sleep(2)
 29    vehicle.simple_takeoff(altitude)
 30
 31    while True:
 32        print("Reached Height = ", vehicle.location.global_relative_frame.alt)
 33
 34        if vehicle.location.global_relative_frame.alt >= (altitude - 1.5):
 35            break
 36
 37def change_mode(mode):
 38
 39    """
 40
 41    This function will change the mode of the Vehicle.
 42
 43    Inputs:
 44        1.  mode            -   Vehicle's Mode
 45
 46    """
 47
 48    vehicle.mode = VehicleMode(mode)
 49
 50def send_to(latitude, longitude, altitude):
 51
 52    """
 53
 54    This function will send the drone to desired location, when the
 55    vehicle is in GUIDED mode.
 56
 57    Inputs:
 58        1.  latitude            -   Destination location's Latitude
 59        2.  longitude           -   Destination location's Longitude
 60        3.  altitude            -   Vehicle's flight Altitude
 61
 62    """
 63
 64    if vehicle.mode.name == "GUIDED":
 65        location = LocationGlobalRelative(latitude, longitude, float(altitude))
 66        vehicle.simple_goto(location)
 67        time.sleep(1)
 68
 69def change_alt(step):
 70
 71    """
 72
 73    This function will increase or decrease the altitude
 74    of the vehicle based on the input.
 75
 76    Inputs:
 77        1.  step            -   Increase 5 meters of altitude from
 78                                current altitude when INC is passed as argument.
 79
 80                            -   Decrease 5 meters of altitude from
 81                                current altitude when DEC is passed as argument.
 82
 83    """
 84
 85    actual_altitude = int(vehicle.location.global_relative_frame.alt)
 86    changed_altitude = [(actual_altitude + 5), (actual_altitude - 5)]
 87
 88    if step == "INC":
 89        if changed_altitude[0] <= 50:
 90            send_to(vehicle.location.global_frame.lat, vehicle.location.global_frame.lon, changed_altitude[0])
 91        else:
 92            print("Vehicle Reached Maximum Altitude!!!")
 93
 94    if step == "DEC":
 95        if changed_altitude[1] >= 5:
 96            send_to(vehicle.location.global_frame.lat, vehicle.location.global_frame.lon, changed_altitude[1])
 97        else:
 98            print("Vehicle Reached Minimum Altitude!!!")
 99
100def distance_calculation(homeLattitude, homeLongitude, destinationLattitude, destinationLongitude):
101
102    """
103
104    This function returns the distance between two geographiclocations using
105    the haversine formula.
106
107    Inputs:
108        1.  homeLattitude          -   Home or Current Location's  Latitude
109        2.  homeLongitude          -   Home or Current Location's  Longitude
110        3.  destinationLattitude   -   Destination Location's  Latitude
111        4.  destinationLongitude   -   Destination Location's  Longitude
112
113    """
114
115    # Radius of earth in metres
116    R = 6371e3
117
118    rlat1, rlon1 = homeLattitude * (math.pi/180), homeLongitude * (math.pi/180)
119    rlat2, rlon2 = destinationLattitude * (math.pi/180), destinationLongitude * (math.pi/180)
120    dlat = (destinationLattitude - homeLattitude) * (math.pi/180)
121    dlon = (destinationLongitude - homeLongitude) * (math.pi/180)
122
123    # Haversine formula to find distance
124    a = (math.sin(dlat/2) * math.sin(dlat/2)) + (math.cos(rlat1) * math.cos(rlat2) * (math.sin(dlon/2) * math.sin(dlon/2)))
125    c = 2 * math.atan2(math.sqrt(a), math.sqrt(1-a))
126
127    # Distance (in meters)
128    distance = R * c
129
130    return distance
131
132def destination_location(homeLattitude, homeLongitude, distance, bearing):
133
134    """
135
136    This function returns the latitude and longitude of the
137    destination location, when distance and bearing is provided.
138
139    Inputs:
140        1.  homeLattitude       -   Home or Current Location's  Latitude
141        2.  homeLongitude       -   Home or Current Location's  Longitude
142        3.  distance            -   Distance from the home location
143        4.  bearing             -   Bearing angle from the home location
144
145    """
146
147    # Radius of earth in metres
148    R = 6371e3
149
150    rlat1, rlon1 = homeLattitude * (math.pi/180), homeLongitude * (math.pi/180)
151
152    d = distance
153
154    #Converting bearing to radians
155    bearing = bearing * (math.pi/180)
156
157    rlat2 = math.asin((math.sin(rlat1) * math.cos(d/R)) + (math.cos(rlat1) * math.sin(d/R) * math.cos(bearing)))
158    rlon2 = rlon1 + math.atan2((math.sin(bearing) * math.sin(d/R) * math.cos(rlat1)) , (math.cos(d/R) - (math.sin(rlat1) * math.sin(rlat2))))
159
160    #Converting to degrees
161    rlat2 = rlat2 * (180/math.pi)
162    rlon2 = rlon2 * (180/math.pi)
163
164    # Lat and Long as an Array
165    location = [rlat2, rlon2]
166
167    return location
168
169def triangle_calculation(side_length):
170
171    """
172
173    This function will generate the geographical coordinates (latitudes & longitudes)
174    of the triangular (Equilateral Triangle) path with the given side length. The origin or
175    reference location for the generation of the triangular trajectory is the vehicle's current location.
176
177    Inputs:
178        1.  side_length         -   Side length of the Equilateral Triangle
179
180    """
181
182    # Vehicle's heading and current location
183    angle          =  int(vehicle.heading)
184    loc            =  (vehicle.location.global_frame.lat, vehicle.location.global_frame.lon, vehicle.location.global_relative_frame.alt)
185
186    # Offset Angle
187    offset_angle   =  90
188
189    # Decrementing offset angle in the vehicle's heading angle to form the
190    # triangle direction with respect to the vehicle's heading angle.
191    angle         -=  offset_angle
192
193    # Declaring a array variable to store
194    # the geogrpahical location of triangular points
195    final_location =  []
196
197    for count in range(3):
198        # Incrementing heading angle
199        # Exterior angle of equilateral triangle = 120 degrees
200        angle  += 120
201
202        new_loc =  destination_location(homeLattitude = loc[0], homeLongitude = loc[1], distance = side_length, bearing = angle)
203        final_location.append((new_loc[0], new_loc[1], loc[2]))
204        loc     =  (new_loc[0], new_loc[1], loc[2])
205
206    return final_location
207
208def triangular_mission(side_length):
209
210    """
211
212    This function retrieves the triangle coordinates from the triangle_calculation()
213    function and guides the vehicle to the retrieved points.
214
215    Inputs:
216        1.  side_length         -   Side length of the equilateral triangle
217
218    """
219
220    # Retrieving the array of the locations of the triangular path
221    locations  =  triangle_calculation(side_length = side_length)
222
223    for location in locations:
224
225        # Send vehicle to the destination
226        send_to(latitude = location[0], longitude = location[1], altitude = location[2])
227
228        while True:
229
230            # Distance between the current location of the vehicle and the destination
231            distance = distance_calculation(homeLattitude = vehicle.location.global_frame.lat,
232                                            homeLongitude = vehicle.location.global_frame.lon,
233                                            destinationLattitude  = location[0],
234                                            destinationLongitude = location[1])
235
236            if distance <= 1.8:
237                break
238
239            time.sleep(2)
240
241def main():
242
243    # Declaring Vehicle as global variable
244    global vehicle
245
246    # Connecting the Vehicle
247    vehicle = connect('udpin:127.0.0.1:14551', baud=115200)
248
249    # Setting the Heading angle constant throughout flight
250    if vehicle.parameters['WP_YAW_BEHAVIOR'] != 0:
251        vehicle.parameters['WP_YAW_BEHAVIOR'] = 0
252        print("Changed the Vehicle's WP_YAW_BEHAVIOR parameter")
253
254    while True:
255
256        # Getting Input from User
257        value = input("Enter your Input:\n").upper()
258
259        if value == 'TAKEOFF':
260            basic_takeoff(altitude = 5)
261
262        if value == 'LAND':
263            change_mode(mode = value)
264
265        if value == 'INC' or 'DEC':
266            change_alt(step = value)
267
268        if value == 'TRIANGLE':
269            side = int(input("Enter Side Length of the Triangular Path (in meters):\n"))
270            triangular_mission(side_length = side)
271
272if __name__ == "__main__":
273    main()
Source: Link
Note
Embark on a journey to discover the mystical dance of drone yaw with the WP_YAW_BEHAVIOR parameter. This enchanted parameter holds the key to commanding the autopilot’s yaw control during missions and the Return To Launch (RTL) spell.
In our magical code realm, we’ve aligned the stars, setting the yaw behavior to 0 (Never Change Yaw). Yet, the power to alter the destiny of your drone’s dance lies in your hands. Consult the table below to decipher the meaning of each value and choreograph the perfect mission:
| Value | Meaning |
|---|---|
| 0 | Never change yaw |
| 1 | Face next waypoint |
| 2 | Face next waypoint except RTL |
| 3 | Face along GPS course |
Unleash your creativity and let your drone traverse the skies in a dance tailored to your desires! ✨🚁💃
Elevate the curtains and initiate the mesmerizing drone ballet by commanding the script triangular_mission.py! Unleash the magic with a single command in your terminal:
python triangular_mission.pyDive into the mesmerizing spectacle of drone choreography! Witness the seamless execution of the triangular mission, orchestrated with precision and finesse. Behold the dance of virtual drones, gracefully gliding through the designated trajectory.
Video Credits: Dhulkarnayn, Elucidate Drones
Note
Embark on this virtual journey not with tangible drones but with the ethereal embrace of ArduPilot’s Software In The Loop (SITL) simulation. The grand spectacle unfolds within Mission Planner, a revered MAVLink supported Ground Control Station (GCS) that gracefully conducts the drone’s symphony. Whether your realm is Windows, Linux, or Mac OS, this enchanting experience awaits, thanks to the mystical essence of Mono.
Embark on an exhilarating journey of drone mastery with the triangular_mission.py script! This Python wizardry enables you to orchestrate any MAVLink supported drone, choreographing a graceful dance in the form of a triangular trajectory.
After the enchanting execution of triangular_mission.py, immerse yourself in the interactive realm by experimenting with the following inputs:
| Input | Description |
|---|---|
| takeoff | Takeoff |
| land | Land |
| inc | Increases the current altitude |
| dec | Decreases the current altitude |
| triangle | Starts the triangular mission |
Note
To unlock the magic, ensure you have the mystical key, dronekit, installed on your device. Utter the incantation below in your terminal if it’s not already bestowed upon you:
sudo pip install dronekitShould you encounter any mysteries during installation, seek guidance in the sacred scrolls of knowledge:
Now, let’s unveil the secrets behind the incantations in the spellbook, unraveling the essence of the core functions:
Witness the arcane powers of the distance_calculation() function! This mystical formula, rooted in the haversine tradition, unveils the secrets of distance between two sacred locations, adorned with latitude and longitude coordinates.
The incantation accepts the following parameters:
| Parameters/Arguments | Meaning |
|---|---|
| homeLattitude | Home Location’s Latitude |
| homeLongitude | Home Location’s Longitude |
| destinationLattitude | Destination Location’s Latitude |
| destinationLongitude | Destination Location’s Longitude |
Behold the mesmerizing manifestation of the destination_location() function! It summons the geographic coordinates of the destination, aligning them with the stars of the home location as its celestial reference.
The sacred parameters for this ritual are:
| Parameters/Arguments | Meaning |
|---|---|
| homeLattitude | Home Location’s Latitude |
| homeLongitude | Home Location’s Longitude |
| distance | Distance from the home location |
| bearing | Bearing angle from the home location |
The triangle_calculation() function generates the geographical coordinates of the triangular path with the given side length. It calculates the vertices of the triangular path by considering the exterior angle as the bearing and the side length as the distance for each side.
The function achieves this by invoking the destination_location() function in a loop thrice. The resulting vertices are converted into geographical coordinates and stored in an array.
To ensure the generated path aligns with the vehicle’s heading, a 90° offset is decremented from the original heading angle. This offset is crucial for preventing the path from deviating from the desired direction. True north serves as a guiding factor in this process3.
Did you know?
True north (geodetic north or geographic north) points towards Earth’s geographic North Pole.
The figure below illustrates the output with an offset value set to zero or without any offset.
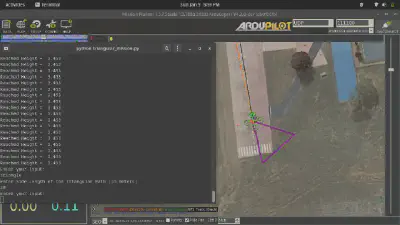
Image Credits: Dhulkarnayn, Elucidate Drones
The triangular_mission() function takes the array of locations generated by the triangle_calculation() function and guides the vehicle to each location sequentially.
The while loop in this function continuously checks the distance between the vehicle’s current location and the next location until the distance is approximately zero.
As we wrap up this journey into the world of drone programming and the art of orchestrating a graceful triangular trajectory using dronekit-python, I’m thrilled to have been your guide through the skies of technology.
But, hey, the adventure doesn’t end here! Your thoughts, ideas, and feedback are the secret ingredients that make this drone odyssey truly remarkable. Let your voice soar in the comments below, and let’s spark a conversation that takes flight!
Remember, sharing the thrill of mastering drone programming is a gift that keeps on giving. So, if you found this article to be your compass in the vast skies of knowledge, why not share the joy with your friends? After all, sharing is caring, and together, we can inspire the next generation of drone enthusiasts.
Thank you for joining me on this aerial expedition.
Equilateral triangle, Wikipedia. ↩︎
Sum of Exterior Angles of Triangle, Cuemath. ↩︎
True North, Wikipedia. ↩︎
This post is licensed under Creative Commons Attribution-ShareAlike 4.0 International (CC BY-SA 4.0) by the author.
Please consider supporting this project!
If this article has been of help to you, and you feel generous at the moment, don’t hesitate to buy us a coffee. It's an easy, fun and direct way to show your support — any amount of coffee is highly appreciated.