Title here
Summary here
November 12, 2021 in Aerospace, Drones by ![]() Dhulkarnayn—6 minutes
Dhulkarnayn—6 minutes
If you’re gearing up for a captivating dance of drones in a swarm spectacle, orchestrating a symphony of coordinated movements, the first step is to weave the intricate threads that connect these aerial performers at the Ground Control Station (GCS). In this aerial ballet, my go-to conductor is none other than Mission Planner, thanks to its sleek and intuitive interface that transforms the complex task of linking multiple vehicles into a seamless performance.

Multiple Vehicles Connected to Mission Planner
The beauty lies in the flexibility - an ability to connect an n number of devices to Mission Planner. The only limit? Your computer’s prowess. It’s a dynamic dance floor where your computer’s configuration sets the stage for the number of drones that can join the airborne ensemble.
So, as you embark on this journey of connecting multiple vehicles, envision a sky adorned with synchronized drones, each choreographed by the seamless connectivity Mission Planner brings to the spectacle.
Prepare to set sail into the realm of seamless connectivity as you embark on the journey to link your vehicle with Mission Planner. Navigate the skies with finesse and follow these steps:
Click on the captivating CONNECT button located at the pinnacle of the window, beckoning you to delve into the world of vehicle coordination.
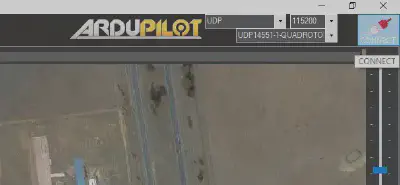
Connect Button - Mission Planner
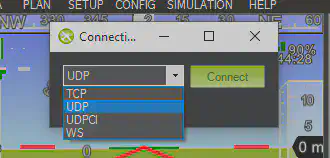
Before taking the plunge and clicking CONNECT, ensure you don’t miss a beat by selecting the telemetry connection type—options abound with the allure of TCP, UDP, Serial—from the dropdown box. It’s your backstage pass to the techie symphony.
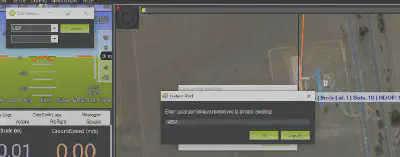
With a click that echoes excitement, a dialog box gracefully unfurls. Within this virtual treasure chest, enter the sacred port number, the secret key to establishing the coveted mavlink connection between your vehicle and the Mission Planner.
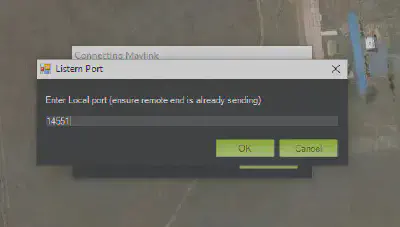
Listern Port (Dialog Box) - Mission Planner
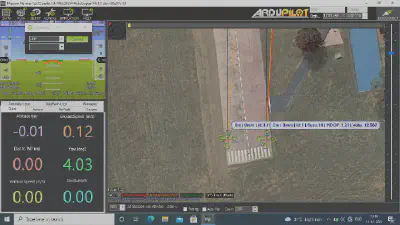
Seal the deal by pressing the OK button on the dialog box. In a symphony of technology, your intended vehicle gracefully takes its place, connected and ready for the aerial performance ahead.
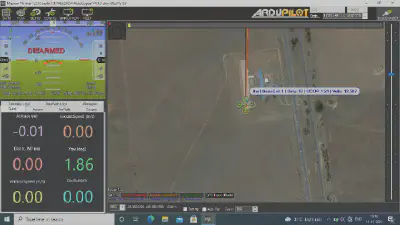
A Vehicle connected to Mission Planner
As you witness the vehicle seamlessly join the Mission Planner ensemble, you’ve officially embarked on a connection voyage that promises a sky full of possibilities. Smooth skies ahead!
Embark on the thrilling journey of connecting not just one, but a fleet of drones in the dynamic world of Mission Planner. While linking a single vehicle is a breeze, orchestrating the connection of multiple drones transforms the experience into a captivating aerial dance.
Right-click on the top bar of Mission Planner, a move that opens up a world of possibilities. Select the spellbinding Connection Options to unleash the magic of coordinated flight.
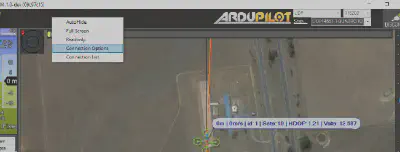
Connection Options - Mission Planner
The act of invoking Connection Options unveils the coveted Connection Options dialog box. Here, in this virtual realm, select your telemetry connection type and let the excitement build as you click the enchanting Connect button.
Connection Options (Dialog Box) - Mission Planner
A dialog box materializes with a click of the CONNECT button, beckoning you to enter the gateway - the port number, the very essence of the mavlink connection between the vehicle and the system.
Listern Port (Dialog Box) - Mission Planner
Click the mystical OK button on the dialog box, and behold, the second vehicle gracefully intertwines its digital essence with Mission Planner, marking the birth of a synchronized aerial duo.
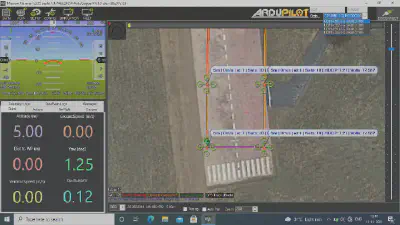
Two Vehicles connected to Mission Planner
Voila! With finesse and flair, you’ve seamlessly connected two vehicles in the Mission Planner. The magic doesn’t stop there; follow these same mesmerizing steps to connect multiple devices in Mission Planner without a fuss.

Four Vehicles connected to Mission Planner
As you stand amidst this digital swarm, revel in the success of orchestrating a fleet of connected vehicles in Mission Planner’s symphony of flight. The sky’s the limit!
Unlock the full potential of Mission Planner as you delve into the fascinating world of swarm operations. Connecting multiple vehicles to the Ground Control Station is not just a technical feat; it’s the gateway to orchestrating a mesmerizing drone ballet.
In the realm of Mission Planner, the true magic lies within the Advanced Options. This hidden treasure trove is where the software unveils its native support for swarm operations, awaiting your command to transform aerial coordination into an art form.
Advanced Options - Mission Planner
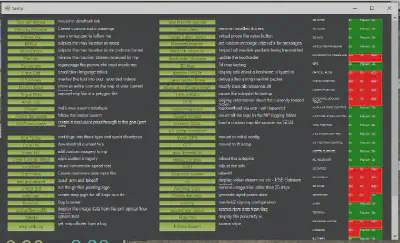
To open the door to swarm operations, take a shortcut through the digital landscape. Simply press the keys Ctrl + F to reveal the Advanced Options window—a portal to a symphony of possibilities.
Swarm Control - Mission Planner
As you step into the Control window, a myriad of swarm operations awaits your creative direction. Picture yourself in the cockpit of this digital dance, where you can:
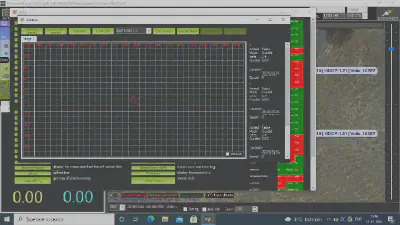
Controlling Four Vehicles - Mission Planner
But wait, the spectacle doesn’t end there. In Mission Planner’s main window, seize the power to control each vehicle individually. A simple dropdown menu in the top right corner grants you the authority to select and direct any specific vehicle, adding a touch of personalized brilliance to the collective swarm.
Embark on this digital odyssey, where Mission Planner transforms from a mere tool into a canvas for your aerial symphony. The sky is not the limit; it’s just the beginning of your drone dance extravaganza!
As we bring this exhilarating exploration of Mission Planner to a close, picture a sky ablaze with the brilliance of your drone revolution. Mission Planner isn’t just a tool; it’s your canvas for orchestrating a dance of drones.
Feel the power as you master swarm operations, commanding each vehicle individually or synchronizing their movements in a collective dance. The Control window becomes your cockpit, and the Advanced Options, your secret passage to a world where drones follow your lead. Yet, this is only the opening act of a drone odyssey. Soar through the skies, explore new maneuvers, and let your creativity take flight.
And now, your voice matters! Share your experiences, insights, and suggestions in the comments section below. Let’s cultivate a community of drone enthusiasts where every idea propels us higher. Until next time, may your skies be clear, and your drones dance in perfect harmony!
This post is licensed under Creative Commons Attribution-ShareAlike 4.0 International (CC BY-SA 4.0) by the author.
Please consider supporting this project!
If this article has been of help to you, and you feel generous at the moment, don’t hesitate to buy us a coffee. It's an easy, fun and direct way to show your support — any amount of coffee is highly appreciated.