Title here
Summary here
December 14, 2021 in Aerospace, Programming by ![]() Dhulkarnayn—12 minutes
Dhulkarnayn—12 minutes
Ever wondered about the buzzing world of drones? As of November 2021, the skies over the United States played host to a staggering 866,076 registered drones, with a whopping 337,832 of them taking on the role of commercial flyers, all according to the watchful eye of the Federal Aviation Administration (FAA). This armada of unmanned aircraft takes to the skies, each with its own mission – a spectacle that has become increasingly common in our daily lives.

Image Credits: Pixabay
If you find yourself in possession of a DIY drone or one governed by community-supported flight controllers such as pixhawk or navio, here’s a fascinating tidbit: you have the power to take control using the marvel that is DroneKit-Python.
The DroneKit-Python stands tall as an Application Programming Interface (API), a gateway empowering developers to craft Python applications that seamlessly communicate with their airborne companions via the MAVLink protocol.1 Remarkably, this ingenious tool has been embraced by the developer community, witnessing over 463,900 downloads, a testament to its popularity according to Pepy.2 Check out its impressive download statistics with this badge:
Embark on an exciting journey into the realm of drone programming, where your computer’s keyboard becomes the cockpit of control. But wait, before you navigate the skies, you must master the art of detecting keypresses using Python.

Image Credits: Pixabay
Enter the stage, where various Python packages eagerly await to assist you in the grand performance of keypress detection. Meet the contenders:
In this odyssey of code, we choose sshkeyboard. Why, you ask? Well, compared to its counterparts, pyinput and keyboard, sshkeyboard boasts some remarkable advantages.3
sshkeyboardThe gateway to the enchanting world of keyboard-controlled drones is none other than sshkeyboard. To open this gateway on your device, wield the pip command in your terminal like a wizard:
pip install sshkeyboardFor those who prefer shortcuts, conjure the terminal window with the mystical key combination Ctrl + Alt + T
sshkeyboardWith sshkeyboard now at your beck and call, you can summon its powers into your Python script with a simple incantation:
 1from sshkeyboard import listen_keyboard
 2
 3def press(key):
 4    print(f"'{key}' is pressed")
 5
 6def main():
 7    listen_keyboard(on_press=press)
 8
 9if __name__ == "__main__":
10    main()
Craft a parchment of code named keypress.py on your device, etching the script within its digital confines. Save this script, for it holds the key to a harmonious connection between your keyboard and drone.
To set this magical script into motion, utter the following spell in your terminal:
python keypress.pyBehold, the script conjures a mesmerizing display, capturing the dance of keystrokes with an ethereal visual:
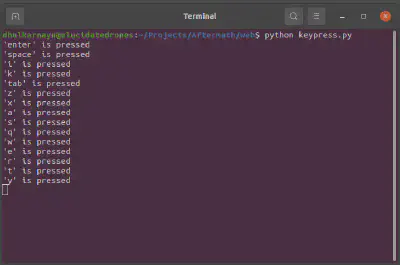
Detecting Keypresses using Python
In this spellbinding script, the listen_keyboard() function takes center stage, weaving a tapestry of logged keypresses as it runs incessantly in a separate thread. The protagonist, press(key), plays its role by printing the keys summoned from the depths of the keyboard.
Note
By default, the script bows gracefully to the ESC key, halting its enchanting performance upon its command.
Having mastered the enchanting art of keypress detection in Python, let’s now embark on a thrilling quest: controlling a drone using the magical incantations of your keyboard.
Note
Before delving into this mesmerizing realm, consider perusing my previous masterpiece, How to Control a Drone Using Python?. It’s a tale crafted for beginners, a primer to the technological wonders awaiting in drone programming.
To guide your drone’s graceful dance through the skies, you’ll need the trusted companion: the dronekit-python package. With it, the very fabric of your scripts will intertwine with the essence of flight.
For the keyboard to become your wand in this aerial ballet, you must choreograph a set of keys to execute a symphony of tasks with each press. In essence, you’re mapping the language of keypresses to the graceful movements and actions of your drone.
The Python script showcased in this tale orchestrates the following majestic maneuvers when you invoke the listed keys on your keyboard:
| Keys | Description |
|---|---|
| t | Takeoff |
| l | Changes the vehicle mode to LAND |
| g | Changes the vehicle mode to GUIDED |
| r | Changes the vehicle mode to RTL |
| ← | Vehicle to the Left |
| → | Vehicle to the Right |
| ↑ | Moves the Vehicle Forward |
| ↓ | Moves the Vehicle Backward |
| Spacebar | Increases vehicle altitude by 5 meters from the current altitude |
| Tab | Decreases vehicle altitude by 5 meters from the current altitude |
Picture this: a keypress, like the stroke of a conductor’s baton, commands the drone to ascend from the earthly stage to a lofty 5 meters. And just as effortlessly, another key sends it gracefully landing to the same hallowed ground.
Behold, the enchanted script that transforms your keyboard into a wand, commanding a drone to dance across the skies. To wield this magical prowess, you can either summon the script to your device through the mystical git command or perform the ancient act of copy and paste into a file named keycontrol.py.
git clone https://github.com/Dhulkarnayn/control-drone-with-keyboardAlternatively, you may choose to manually transcribe the script into a parchment named keycontrol.py on your device.
keycontrol.py 1#!/usr/bin/env python
2
3#...........................................................................
4# Author: Saiffullah Sabir Mohamed
5# Github: https://github.com/TechnicalVillager
6# Website: http://technicalvillager.github.io/
7# Source: https://github.com/TechnicalVillager/control-drone-with-keyboard/
8#...........................................................................
9
10# Import Necessary Packages
11from dronekit import connect, VehicleMode, LocationGlobalRelative
12import time, math
13from sshkeyboard import listen_keyboard
14
15def basic_takeoff(altitude):
16
17 """
18
19 This function take-off the vehicle from the ground to the desired
20 altitude by using dronekit's simple_takeoff() function.
21
22 Inputs:
23 1. altitude - TakeOff Altitude
24
25 """
26
27 vehicle.mode = VehicleMode("GUIDED")
28 vehicle.armed = True
29 time.sleep(2)
30 vehicle.simple_takeoff(altitude)
31
32 while True:
33 print("Reached Height = ", vehicle.location.global_relative_frame.alt)
34
35 if vehicle.location.global_relative_frame.alt >= (altitude - 1.5):
36 break
37 time.sleep(1)
38
39
40def change_mode(mode):
41
42 """
43
44 This function will change the mode of the Vehicle.
45
46 Inputs:
47 1. mode - Vehicle's Mode
48
49 """
50
51 vehicle.mode = VehicleMode(mode)
52
53
54def send_to(latitude, longitude, altitude):
55
56 """
57
58 This function will send the drone to desired location, when the
59 vehicle is in GUIDED mode.
60
61 Inputs:
62 1. latitude - Destination location's Latitude
63 2. longitude - Destination location's Longitude
64 3. altitude - Vehicle's flight Altitude
65
66 """
67
68 if vehicle.mode.name == "GUIDED":
69 location = LocationGlobalRelative(latitude, longitude, float(altitude))
70 vehicle.simple_goto(location)
71 time.sleep(1)
72
73def change_alt(step):
74
75 """
76
77 This function will increase or decrease the altitude
78 of the vehicle based on the input.
79
80 Inputs:
81 1. step - Increase 5 meters of altitude from
82 current altitude when INC is passed as argument.
83
84 - Decrease 5 meters of altitude from
85 current altitude when DEC is passed as argument.
86
87 """
88
89 actual_altitude = int(vehicle.location.global_relative_frame.alt)
90 changed_altitude = [(actual_altitude + 5), (actual_altitude - 5)]
91
92 if step == "INC":
93 if changed_altitude[0] <= 50:
94 send_to(vehicle.location.global_frame.lat, vehicle.location.global_frame.lon, changed_altitude[0])
95 else:
96 print("Vehicle Reached Maximum Altitude!!!")
97
98 if step == "DEC":
99 if changed_altitude[1] >= 5:
100 send_to(vehicle.location.global_frame.lat, vehicle.location.global_frame.lon, changed_altitude[1])
101 else:
102 print("Vehicle Reached Minimum Altitude!!!")
103
104
105def destination_location(homeLattitude, homeLongitude, distance, bearing):
106
107 """
108
109 This function returns the latitude and longitude of the
110 destination location, when distance and bearing is provided.
111
112 Inputs:
113 1. homeLattitude - Home or Current Location's Latitude
114 2. homeLongitude - Home or Current Location's Latitude
115 3. distance - Distance from the home location
116 4. bearing - Bearing angle from the home location
117
118 """
119
120 #Radius of earth in metres
121 R = 6371e3
122
123 rlat1 = homeLattitude * (math.pi/180)
124 rlon1 = homeLongitude * (math.pi/180)
125
126 d = distance
127
128 #Converting bearing to radians
129 bearing = bearing * (math.pi/180)
130
131 rlat2 = math.asin((math.sin(rlat1) * math.cos(d/R)) + (math.cos(rlat1) * math.sin(d/R) * math.cos(bearing)))
132 rlon2 = rlon1 + math.atan2((math.sin(bearing) * math.sin(d/R) * math.cos(rlat1)) , (math.cos(d/R) - (math.sin(rlat1) * math.sin(rlat2))))
133
134 #Converting to degrees
135 rlat2 = rlat2 * (180/math.pi)
136 rlon2 = rlon2 * (180/math.pi)
137
138 # Lat and Long as an Array
139 location = [rlat2, rlon2]
140
141 return location
142
143def control(value):
144
145 """
146
147 This function call the respective functions based on received arguments.
148
149 t - Take-Off
150 l - Land
151 g - Guided Mode
152 r - RTL Mode
153 up, down,
154 right, left - This will call the navigation() function
155
156 Inputs:
157 1. value - ['space', 'tab', 't', 'l', 'g', 'r', 'up', 'down', 'right', 'left']
158
159 """
160
161 allowed_keys = ['space', 'tab', 't', 'l', 'g', 'r', 'up', 'down', 'right', 'left']
162
163 if value in allowed_keys:
164
165 if value == 'space':
166 change_alt(step = "INC")
167
168 if value == 'tab':
169 change_alt(step = "DEC")
170
171 if value == 't':
172 if int(vehicle.location.global_relative_frame.alt) <= 5:
173 basic_takeoff(altitude = 5)
174
175 if value == 'l':
176 change_mode(mode = "LAND")
177
178 if value == 'g':
179 change_mode(mode = "GUIDED")
180
181 if value == 'r':
182 change_mode(mode = "RTL")
183
184 if value in allowed_keys[-4:]:
185 navigation(value = value)
186
187 else:
188 print("Enter a valid Key!!!")
189
190def navigation(value):
191
192 """
193
194 This function moves the vehicle to front, back, right, left
195 based on the input argument.
196
197 UP - Moves the Vehicle to Forward
198 DOWN - Moves the Vehicle to Backward
199 RIGHT - Moves the Vehicle to Right
200 LEFT - Moves the Vehicle to Left
201
202 Inputs:
203 1. value - [right, left, up, down]
204
205 """
206
207 # Vehicle Location
208 angle = int(vehicle.heading)
209 loc = (vehicle.location.global_frame.lat, vehicle.location.global_frame.lon, vehicle.location.global_relative_frame.alt)
210
211 # Default Distance in meters
212 default_distance = 5
213
214 if value == 'up':
215 front = angle + 0
216 new_loc = destination_location(homeLattitude = loc[0], homeLongitude = loc[1], distance = default_distance, bearing = front)
217 send_to(new_loc[0], new_loc[1], loc[2])
218
219 if value == 'down':
220 back = angle + 180
221 new_loc = destination_location(homeLattitude = loc[0], homeLongitude = loc[1], distance = default_distance, bearing = back)
222 send_to(new_loc[0], new_loc[1], loc[2])
223
224 if value == 'right':
225 right = angle + 90
226 new_loc = destination_location(homeLattitude = loc[0], homeLongitude = loc[1], distance = default_distance, bearing = right)
227 send_to(new_loc[0], new_loc[1], loc[2])
228
229 if value == 'left':
230 left = angle -90
231 new_loc = destination_location(homeLattitude = loc[0], homeLongitude = loc[1], distance = default_distance, bearing = left)
232 send_to(new_loc[0], new_loc[1], loc[2])
233
234def press(key):
235
236 """
237
238 This function prints the keybooard presses and calls the control()
239 function.
240
241 Inputs:
242 1. key - Pressed keyboard Key
243
244 """
245
246 print(f"'{key}' is pressed")
247
248 # Sending Control Inputs
249 control(value = key)
250
251def main():
252
253 # Declaring Vehicle as global variable
254 global vehicle
255
256 # Connecting the Vehicle
257 vehicle = connect('udpin:127.0.0.1:14551', baud=115200)
258
259 # Setting the Heading angle constant throughout flight
260 if vehicle.parameters['WP_YAW_BEHAVIOR'] != 0:
261 vehicle.parameters['WP_YAW_BEHAVIOR'] = 0
262 print("Changed the Vehicle's WP_YAW_BEHAVIOR parameter")
263
264 # Listen Keyboard Keys
265 listen_keyboard(on_press=press)
266
267if __name__ == "__main__":
268 main()Source: Link
Note
WP_YAW_BEHAVIOR is a parameter that determines how the autopilot controls the yaw during missions and Return To Launch (RTL).
As the method used in the above code is completely based on the heading angle, the yaw behavior of the drone is set to 0 (Never Change Yaw). You can change the WP_YAW_BEHAVIOR parameter for other missions based on your needs by referring to the following table:
| Value | Meaning |
|---|---|
| 0 | Never change yaw |
| 1 | Face next waypoint |
| 2 | Face next waypoint except RTL |
| 3 | Face along GPS course |
To unveil the mesmerizing performance, execute the script keycontrol.py with this spell:
python keycontrol.py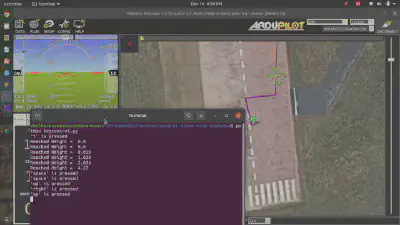
Video Credits: Dhulkarnayn, Elucidate Drones
Note
Instead of using an actual drone, I’ve used ArduPilot’s Software In The Loop (SITL) simulation and Mission Planner as Ground Control Station (GCS) software. Mission Planner is one of the MAVLink supported Ground Control Station (GCS) software that runs natively on the Windows operating system. Also, you can able run Mission Planner on Linux and Mac OS using Mono.
As the incantations in each function of this mystical script are self-explanatory, let’s delve into some sorcery to enhance the script based on your whims:
To alter the default Take-Off altitude, modify altitude = 5 to your desired height. For instance, to set the take-off altitude to 10 meters:
basic_takeoff(altitude = 10)Likewise, to adjust the default vehicle movement distance (set at 5 meters), amend default_distance = 5 to your preferred value. For example, to change the default distance to 10 meters:
default_distance = 10When space or tab is pressed, the altitude increases or decreases by 5 meters, respectively. To modify this threshold, alter changed_altitude = [(actual_altitude + 5), (actual_altitude - 5)]. For instance, to change the threshold to 8 meters:
changed_altitude = [(actual_altitude + 8), (actual_altitude - 8)]Voila! Now, let your fingers conjure the magic, and behold your drone’s dance at your command!
In this Python-powered drone odyssey, you’ve unlocked the art of orchestrating airborne performances with your keyboard. Your code is the choreographer, guiding the drone through a symphony of maneuvers.
But, it’s not a finale; it’s an intermission. The script is your canvas—customize, tweak, and watch your drone dance to your coding tune. This is your aerial ballet, with Python as the maestro.
Ready to join the dance? Share your thoughts, questions, and drone tales in the comments below. Let the coding symphony continue! 🚁💻🌌
Official Documentation, DroneKit-Python. ↩︎
How it works, Official Documentation, sshkeyboard. ↩︎
This post is licensed under Creative Commons Attribution-ShareAlike 4.0 International (CC BY-SA 4.0) by the author.
Please consider supporting this project!
If this article has been of help to you, and you feel generous at the moment, don’t hesitate to buy us a coffee. It's an easy, fun and direct way to show your support — any amount of coffee is highly appreciated.