Title here
Summary here
November 10, 2021 in Aerospace, Drones by ![]() Dhulkarnayn—4 minutes
Dhulkarnayn—4 minutes
MAVProxy is a versatile Ground Control Station (GCS) software that supports the MAVLink protocol. If you’re unfamiliar with MAVProxy, it serves as a powerful command-line-based GCS, providing features such as transmitting messages from your UAV over the network via UDP to multiple devices1.
Image Credits: Web illustrations by Storyset
If your trusty companion is fueled by the pulse of technology and runs on the rhythmic heartbeat of operating systems, then the MAVProxy magic is ready to dance on your device! 🕺💻
Behold, adventurers! MAVProxy is here to embrace the realms of:
Ready to install MAVProxy? Let’s dive into the installation rituals tailored for each OS, unlocking a symphony of possibilities in the UAV skies! 🌐🚁
For Linux-based systems, follow these commands in your terminal:
sudo python3 -m pip install --upgrade future lxml
sudo python3 -m pip install --upgrade pymavlink
sudo python3 -m pip install --upgrade mavproxy
echo "export PATH=$PATH:$HOME/.local/bin" >> ~/.bashrc
Unlock the portal to the digital realm effortlessly by employing the magical key incantation: ⌨️ Ctrl + Alt + T. With a mere touch of these enchanted keys, watch as the terminal window materializes before you, unveiling a world of coding wonders.

Successful Installation of MAVProxy on Linux
Once you’ve successfully commanded your terminal with the steps above, bid farewell to that terminal window and summon a fresh one to perform the following action.
mavproxy.pyIf you happen to encounter a warning resembling the window below in your terminal, rejoice! MAVProxy has triumphantly taken root on your device! 🚀✨
WARNING: You should uninstall ModemManager as it conflicts with APM and Pixhawk
Auto-detected serial ports are:
/dev/ttyS0
/dev/ttyS1
/dev/ttyS2
/dev/ttyS3
Warning: multiple possible serial ports. Use console GUI or 'link add' to add port, or restart using --master to select a single port
No mode mapping available
Failed to load module: No module named 'terrain'. Use 'set moddebug 3' in the MAVProxy console to enable traceback
Log Directory:
Telemetry log: mav.tlog
MAV>
Sometimes, your machine might play hard to get, and mavproxy.py might not gracefully dance into action post-installation. Fear not! To coax it into the limelight, simply run the command below once and give mavproxy.py another whirl:
source ~/.bashrcTo bid farewell to the ModemManager causing conflicts with APM and Pixhawk on your device, gracefully usher it out by executing the following command in your terminal.
sudo apt-get remove modemmanagerAfter gracefully parting ways with ModemManager, launching the mavproxy.py will unveil the following outcome in your terminal.
mavproxy.py
Auto-detected serial ports are:
/dev/ttyS0
/dev/ttyS1
/dev/ttyS2
/dev/ttyS3
Warning: multiple possible serial ports. Use console GUI or 'link add' to add port, or restart using --master to select a single port
No mode mapping available
Failed to load module: No module named 'terrain'. Use 'set moddebug 3' in the MAVProxy console to enable traceback
Log Directory:
Telemetry log: mav.tlog
MAV>
Congratulations! You’ve just unlocked another feature on your Linux machine! Voila!✨
MAVProxy boasts a native Windows installer, making the installation of mavproxy.exe on your Windows machine a breeze. You can acquire the latest MAVProxy version either from the provided link below or by visiting the official downloads site2.
Once MAVProxy is installed, attempt to run the following command in your Command Prompt.
mavproxy.exeIf you encounter a display resembling the one below, consider it a triumph – MAVProxy is now successfully installed on your Windows device!
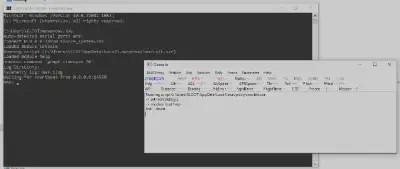
MAVProxy on Windows
As I don’t currently have a Mac device in my tech lineup, I’ve enlisted the installation guidance straight from the official MAVProxy Download and Installation page3. Feel free to give it a spin on your Mac and let me know how the MAVProxy magic unfolds for you! Your feedback is the spark that keeps the tech flame burning bright.
sudo pip install wxPython
sudo pip install gnureadline
sudo pip install billiard
sudo pip install numpy pyparsing
sudo pip install MAVProxyBravo, intrepid tech trailblazers! 🎉 You’ve conquered the MAVProxy installation cosmos and now hold the keys to a drone-powered universe. But hey, the adventure doesn’t end here – it’s just the beginning!
🌐 Your feedback is the stardust that fuels our journey. Share your triumphs, tales, and even the occasional tech quirk in the comments below. Let’s create a community of MAVProxy mavens! 🚀💬
Remember, the tech galaxy is vast, and every insight you share adds a new constellation to our map. Until our next tech rendezvous, happy flying and keep those propellers spinning! 🌌🔧
This post is licensed under Creative Commons Attribution-ShareAlike 4.0 International (CC BY-SA 4.0) by the author.
Please consider supporting this project!
If this article has been of help to you, and you feel generous at the moment, don’t hesitate to buy us a coffee. It's an easy, fun and direct way to show your support — any amount of coffee is highly appreciated.