Title here
Summary here
November 4, 2021 in Aerospace, Drones by ![]() Dhulkarnayn—5 minutes
Dhulkarnayn—5 minutes
As drone operators and developers, finding a suitable Ground Control Station (GCS) is crucial. While there are various mavlink-supported GCS software for Linux, Mission Planner stands out with its modest user interface and additional features. Unfortunately, Mission Planner natively supports only Windows1, but fear not – you can run it on Linux using Mono.
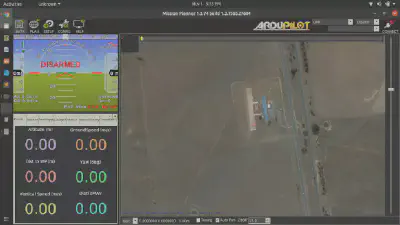
Mission Planner running on Ubuntu
Mission Planner, built using .NET Framework, offers a compelling choice for drone operators due to its features and interface.
To run Mission Planner on Linux, follow these steps:
Embarking on the Mono adventure? Fantastic! Get ready to harness its brilliance on various Linux distributions. Whether you’re navigating the Ubuntu universe, exploring Debian’s depths, or diving into the realms of Raspbian, Red Hat Enterprise Linux (RHEL), CentOS, or Fedora, Mono’s stable version is within your grasp. 2
“But I’m a proud Ubuntu user,” you say? No worries! I’ve got you covered with step-by-step installation guidance tailored for Ubuntu. For fellow explorers on different Linux terrains, fear not! Simply dance your way to the official downloads page of Mono, and you’ll find your installation roadmap waiting.
Now, let’s dive into the Mono magic on Ubuntu with the following steps:
For Ubuntu 20.04 (amd64, armhf, arm64, ppc64el)
sudo apt install gnupg ca-certificates
sudo apt-key adv --keyserver hkp://keyserver.ubuntu.com:80 --recv-keys 3FA7E0328081BFF6A14DA29AA6A19B38D3D831EF
echo "deb https://download.mono-project.com/repo/ubuntu stable-focal main" | sudo tee /etc/apt/sources.list.d/mono-official-stable.list
sudo apt update
For Ubuntu 18.04 (i386, amd64, armhf, arm64, ppc64el)
sudo apt install gnupg ca-certificates
sudo apt-key adv --keyserver hkp://keyserver.ubuntu.com:80 --recv-keys 3FA7E0328081BFF6A14DA29AA6A19B38D3D831EF
echo "deb https://download.mono-project.com/repo/ubuntu stable-bionic main" | sudo tee /etc/apt/sources.list.d/mono-official-stable.list
sudo apt update
For Ubuntu 16.04 (i386, amd64, armhf, arm64, ppc64el)
sudo apt-key adv --keyserver hkp://keyserver.ubuntu.com:80 --recv-keys 3FA7E0328081BFF6A14DA29AA6A19B38D3D831EF
sudo apt install apt-transport-https ca-certificates
echo "deb https://download.mono-project.com/repo/ubuntu stable-xenial main" | sudo tee /etc/apt/sources.list.d/mono-official-stable.list
sudo apt updateFeel the power at your fingertips! Embrace the magic by copying and pasting the commands above into your terminal. If you’re a shortcut enthusiast (who isn’t?), summon the terminal window effortlessly with the keyboard sorcery of Ctrl + Alt + T! It’s not just a shortcut; it’s your gateway to the tech realm.
Now that you’ve conquered the previous step, it’s time to summon the full force of Mono onto your machine. Execute the following command to install Mono and let the Mono enchantment begin:
sudo apt install mono-completeTo ensure that Mono has seamlessly woven its magic into your device, perform the mystical verification with the following command:
monoWatch as your terminal lights up with Mono’s presence, confirming that you now wield the power of cross-platform brilliance! 🌐✨ If the terminal displays a warning like the one below after executing the aforementioned command, it’s a clear sign that Mono has been successfully installed on your machine! 🚀
Usage is: mono [options] program [program-options]

Development:
    --aot[=<options>]      Compiles the assembly to native code
    --debug[=<options>]    Enable debugging support, use --help-debug for details
    --debugger-agent=options Enable the debugger agent
    --profile[=profiler]   Runs in profiling mode with the specified profiler module
    --trace[=EXPR]         Enable tracing, use --help-trace for details
    --jitmap               Output a jit method map to /tmp/perf-PID.map
    --help-devel           Shows more options available to developers

Runtime:
    --config FILE          Loads FILE as the Mono config
    --verbose, -v          Increases the verbosity level
    --help, -h             Show usage information
    --version, -V          Show version information
    --version=number       Show version number
    --runtime=VERSION      Use the VERSION runtime, instead of autodetecting
    --optimize=OPT         Turns on or off a specific optimization
                           Use --list-opt to get a list of optimizations
    --attach=OPTIONS       Pass OPTIONS to the attach agent in the runtime.
                           Currently the only supported option is 'disable'.
    --llvm, --nollvm       Controls whenever the runtime uses LLVM to compile code.
    --gc=[sgen,boehm]      Select SGen or Boehm GC (runs mono or mono-sgen)
    --handlers             Install custom handlers, use --help-handlers for details.
    --aot-path=PATH        List of additional directories to search for AOT images.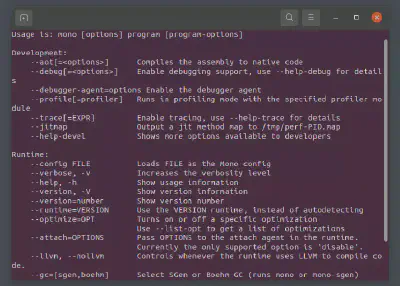
Verification of Mono Installation - Ubuntu
Get ready for the thrilling phase of our mission – downloading Mission Planner! The official downloads page is your gateway to a treasure trove of Mission Planner versions, available in the electrifying formats of .msi and .zip. Now, here’s where the Linux adventure truly kicks in – we’re diving into the world of zipped versions!
Hold onto your seat, as I’m presenting you with links to both the latest version and the stable version of zipped Mission Planner. These links are your golden tickets to a world of drone control wizardry! Choose the version that aligns with your mission objectives and brace yourself for an exhilarating download experience:
Now that you’ve acquired the prized zipped versions of Mission Planner—whether it’s the daring MissionPlanner-stable.zip or the cutting-edge MissionPlanner-latest.zip—it’s time to let Mission Planner soar from your Linux command center.
Feel the excitement as you unzip the downloaded file, revealing the heart of Mission Planner within. As you stand at the entrance of this digital cockpit, envision the possibilities awaiting you.
With the terminal as your launchpad, navigate to the decompressed folder, or effortlessly open the terminal within the folder by right-clicking. The stage is set for the grand reveal!
Now, summon Mission Planner into action with the incantation:
$ mono MissionPlanner.exeBehold! Your Linux device transforms into a mission control center, ready to conquer the skies. Tada! You’ve just unlocked the gateway to running Mission Planner on your Linux device.
Witness the magic unfold as Mission Planner takes flight on Ubuntu, marking the beginning of your drone command odyssey!
Mission Planner running on Ubuntu
You’ve conquered the skies with Mission Planner on Linux, armed with insights from diverse sources. Now, it’s your turn to share your experiences, suggestions, and feedback in the comments below. Let the drone community thrive!
Remember, sharing is caring! If you found this guide exhilarating, spread the word among your friends and fellow enthusiasts. Thanks for embarking on this mission with me. Until our next exploration – keep the propellers spinning and the codes buzzing! 🚁✨
Installing Mission Planner, ArduPilot. ↩︎
This post is licensed under Creative Commons Attribution-ShareAlike 4.0 International (CC BY-SA 4.0) by the author.
Please consider supporting this project!
If this article has been of help to you, and you feel generous at the moment, don’t hesitate to buy us a coffee. It's an easy, fun and direct way to show your support — any amount of coffee is highly appreciated.