Title here
Summary here
November 16, 2021 in Aerospace, Drones by ![]() Dhulkarnayn—5 minutes
Dhulkarnayn—5 minutes
Are you ready to test the limits of your drone’s capabilities? The idea of simulating your drone’s performance before actual deployment is not just practical—it’s downright thrilling! If you’ve been yearning to explore drone-related projects or dive into the realm of robotics, you’re in good company.
After all, these projects often come with the challenge of dealing with high-cost hardware components. But fear not, because we’ve discovered a clever solution that simplifies the Software In the Loop (SITL) simulation process.
Note
Curious about running simulations in Mission Planner using the same ArduPilot’s SITL models found in Linux? If you’re itching to set up ArduPilot’s SITL on your Linux machine, check out this insightful guide:
Image Credits: Technology illustrations by Storyset
When it comes to Ardupilot’s SITL simulation, setting up the environment can be a daunting task, especially for Windows users. But fear not, as we’ve uncovered a straightforward workaround that lets you enable simulation with just a single click, all thanks to Mission Planner.
Ready to dive in?
Mission Planner emerges as a powerhouse in the drone development realm, serving as a mavlink supported Ground Control Station (GCS) software that seamlessly operates on Windows. If you’re an enthusiast using Linux or Mac OS, fret not – Mission Planner’s got you covered too!
Note
A quick heads up: Mission Planner SITL functionality is exclusive to the latest version. Grab your copy by clicking the button below or visiting the official downloads page:
Get ready to immerse yourself in the mesmerizing world of drone simulation! Mission Planner’s Simulation feature opens the gateway to a realm where you can test your drone’s capabilities with the same Software In the Loop (SITL) models used in the Linux environment’s sim_vehicle.py script. The journey to running a successful SITL simulation on Mission Planner involves a few captivating steps:
Begin your adventure by navigating to the SIMULATION tab, nestled among the tabs on the left side of the Mission Planner’s top bar.
Behold, the Simulation Tab in Mission Planner!
Your click on the SIMULATION tab unfolds the captivating landscape of Mission Planner’s Simulation tab, where a plethora of vehicle types awaits your exploration.
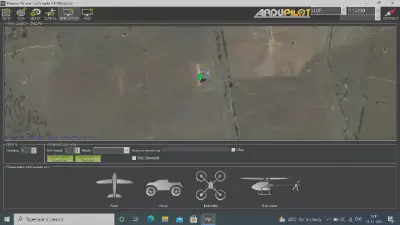
Discover the Simulation Tab’s treasure trove of vehicle types!
You have the power to simulate a variety of vehicles on your device, including:
Make your choice by clicking on the desired vehicle type in Mission Planner, as showcased below.
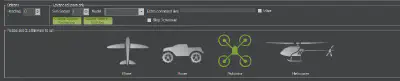
Selecting a vehicle type is your first step into the simulation adventure!
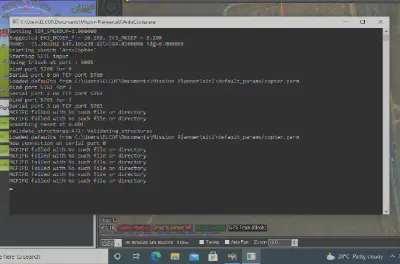
This exciting selection triggers the download of SITL software within Mission Planner, tailored to the specifications of the chosen vehicle’s Ardupilot firmware.
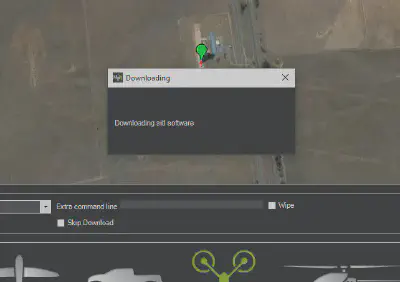
Witness the mesmerizing download of SITL Software in Mission Planner!
However, the thrill doesn’t stop there – be prepared for a brief pause as the SITL simulation automatically downloads through Mission Planner. This action, like all great adventures, demands an active internet connection. Once the download is complete, watch in awe as Mission Planner seamlessly establishes a connection to the SITL software.

Behold the Auto Connect magic in Mission Planner!
As you gaze upon the connections tab on the right side of the top bar, witness the automatic creation of a TCP connection to the simulated vehicle, as showcased below.

The enchanting TCP Connection to the simulated vehicle!
With the SITL application now breathing life into your device alongside Mission Planner, you can gracefully minimize that window. As I embark on a Multirotor simulation, Arducopter.exe hums to life on my device.
Behold the SITL Simulation in full swing on Mission Planner!
By following these mesmerizing steps, you’ll seamlessly unlock the power to run the SITL simulation on Mission Planner. Get ready to soar into the skies of virtual drone exploration!
Welcome to the exhilarating segment where we put our simulated vehicle through its paces. This section is a must-see for beginners navigating the vast landscape of Mission Planner’s simulation. If you’ve already mastered the art, feel free to skip ahead!
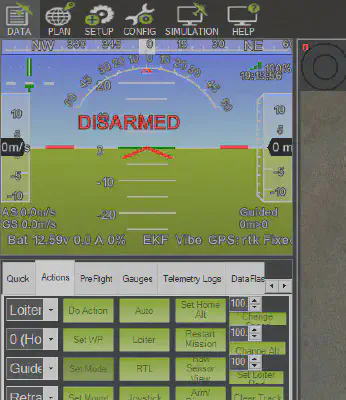
Embark on a journey of discovery as we delve into the intricacies of changing flight modes for your simulated vehicle. Navigate to the Actions tab gracefully positioned under the Heads-up Display (HUD).
Behold the Actions Tab in all its glory!
Immerse yourself in a plethora of possibilities with over 15 flight modes available in the Modes drop-down box within the Actions tab. Choose your desired mode, and with a triumphant click on the Set Mode button, witness the transformation unfold before your eyes.
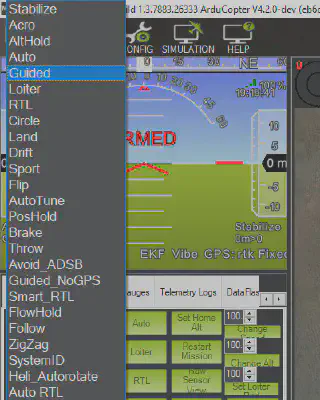
Explore the rich variety of flight modes in Mission Planner!
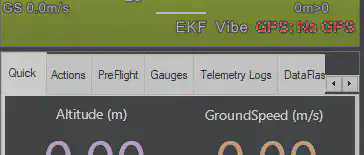
Now, bask in the visual feast of your changed mode displayed proudly in the HUD. Whether it’s Guided or any other mode, let the HUD speak volumes about your simulated vehicle’s newfound prowess.
Guided Mode takes center stage in the Mission Planner HUD!
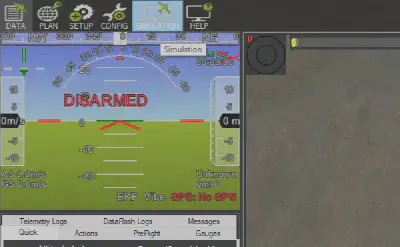
The thrill continues as we venture into the heart of controlling your simulated vehicle. Having switched to Guided mode, take command with the Arm/Disarm button in the Actions tab.
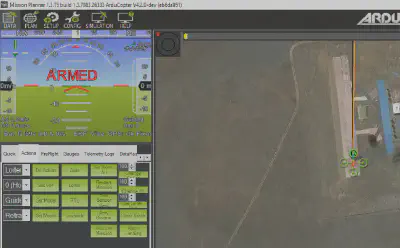
Feel the adrenaline surge as you arm the motors in Mission Planner
But that’s not all – for the grand finale, witness the drama unfold as you disarm the motors. Click again on the Arm/Disarm button, unleashing a dialog box that demands your confirmation. With a resounding Yes, watch as the simulated vehicle gracefully surrenders, motors disarmed.
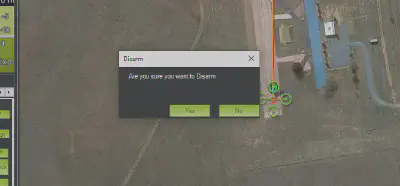
Theatrics unfold as you disarm the motors in Mission Planner!
By following these electrifying steps, you gain the power to command and conquer – arming and disarming the motors of your simulated vehicle in Mission Planner.
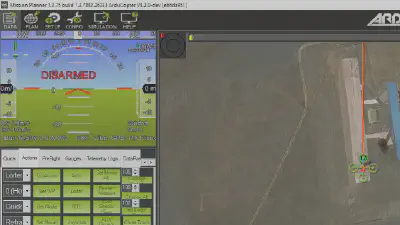
Witness the simulated vehicle’s serene state after disarming in Mission Planner!
In this guide, we’ve delved into the intricacies of configuring the Software In the Loop (SITL) simulation within Mission Planner. Your valuable feedback and suggestions on this topic are eagerly anticipated.
Sharing knowledge is a virtue, so don’t hesitate to share this article with your friends if you found it valuable. Thank you for joining us on this exploration!
Feel free to drop your thoughts and comments below – your insights contribute to the ongoing conversation. Let’s keep the discussion alive!
This post is licensed under Creative Commons Attribution-ShareAlike 4.0 International (CC BY-SA 4.0) by the author.
Please consider supporting this project!
If this article has been of help to you, and you feel generous at the moment, don’t hesitate to buy us a coffee. It's an easy, fun and direct way to show your support — any amount of coffee is highly appreciated.